Recently, I have switched my blog from Blogspot (www.discussbytes.blogspot.com) to a custom domain (www.discussbytes.in). In this post, I will talk about the complete procedure to make this possible on this platform.
Why Should You Use Custom Domain?
Before going to the main topic, I would like to explain to you the need for a custom domain. How does it differ from Blogspot? Below are some of the reasons:
1. It makes your blog look more professional. This would help your visitors having more trust in you.
2. It increases the reach of your websites. Using a custom domain means you can choose a name that is perfect for your business, blog, or website.
3. You can use most of the Ad Networks on your website. Many Ad Networks don't allow Blogspot/Wordpress domain websites for advertising. You can get faster approval in Adsense.
4. A step towards owning your website. Do you know that free domains are not owned by you? You should host and have your own unique domain name to have full control over it.
5. Better SEO score and search engine rankings. A custom domain gets a higher preference than others in Google/ Bing.
6. It is short and easy to remember.
7. It helps in improving your social media rankings and Domain Authority.
Selecting a perfect domain name and extension
There are so many domain providers available in India and worldwide.
The following should be kept in mind while selecting a perfect name:-
1. Try to keep it short. It helps in memorizing it to users
2. Using keywords. If your website is based upon a particular topic, try to include it in your name.
3. Avoid using numbers and hyphen.
4. It is easy to pronounce.
5. Avoid using similar names already present. It will help to differentiate your website.
.com is the most used domain extension with almost 50% of websites using it globally. The most popular used domain extensions are:
- .com- Used worldwide for a general or specific purpose, most popular among all the extensions.
- .etu- Used by Educational Institutes, mainly in the U.S.
- .net- Used for General Purpose
- .gov-Used by governments
- .in- Used for website intended for Indian region. Similar extensions for other countries are available.
- .org- Used by an organization
- .co- Used by companies
Consider using top level domains like .com, .in for better SEO rankings.
Using Domain services for custom domain in Blogger
Next, you need to find a suitable domain provider for your website. In my case, I have preferred to go with GoDaddy.
Some of the best domain providers are:-
GoDaddy
BigRock
Bluehost
Domain.com
Final Setup
1. Select the perfect domain name and extension for your website/blog.
2. After purchasing, go to the settings tab in Blogger.
3. Under Publishing, write the address of your custom domain. Remember to use www as the prefix.
For example www.discussbytes.in
4. It would now show you an error. Don't worry you just need to prove that the domain name belongs to you. It would show you two errors.
5. Then you need to go to your domain provider website and sign in. I have used GoDaddy in my case.
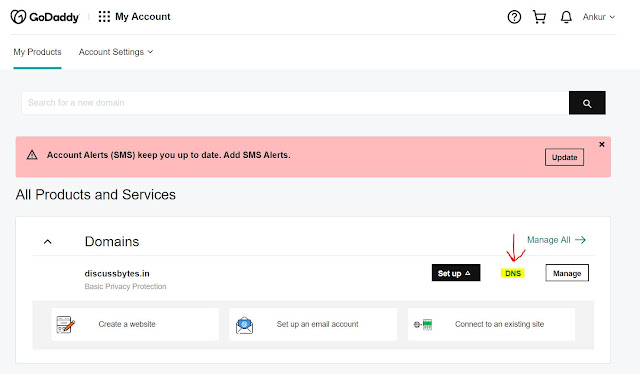
6. Go to your domain provider dashboard. Click on the domain name which you have purchased.
7. Next choose to DNS Settings.
8. Click on Add Record and copy CNAME from Blogger and add one by one. Remember to copy the same Host and Destination values of CNAME. Keep the value of TTL 1 hour in both CNAME. Below is an example showing the same. If you get confused, ask me in the comment section below.
9. Similarly Add A records in DNS settings. You need to add @ in Host Name and IP address in Destination/ Points To section . Keep the TTL 1 hour in all the IP addresses.
There are 4 IP addresses which you need to add:-
216.239.32.21
216.239.34.21
216.239.36.21
216.239.38.21
10. Here is the final screenshot of A Records.
11. Now check your blogger settings. That error would be removed with 5 min- 30 min. It might take more time depending upon your domain provider.
12. After verifying your domain Google would automatically switch your old Blogspot pages to a new custom name.
13. Toggle "Redirect Domain" option on so that your old URLs links to new URLs.
14. Remember to renew your domain name before it expires using GoDaddy website or your domain provider.
Conclusion
The process which seems too difficult isn't that much hard once you get used to it. If you get stuck at any point or have any queries, you can ask me in the comments section below. A custom domain is a must if you are aiming to make your website reach new heights.
Subscribe to our email newsletter for blogger tips and tricks.
Share this article if you find it helpful. Stay connected with us for the latest tech updates.


Nice post 👍 keep some internal and external links for better performance.
ReplyDeleteThanks for your suggestions😃
Delete👍👍👍
ReplyDelete